
APPENDIX A: ESTIMATING RESOURCES FOR W-BEAM GUARDRAIL REPAIR
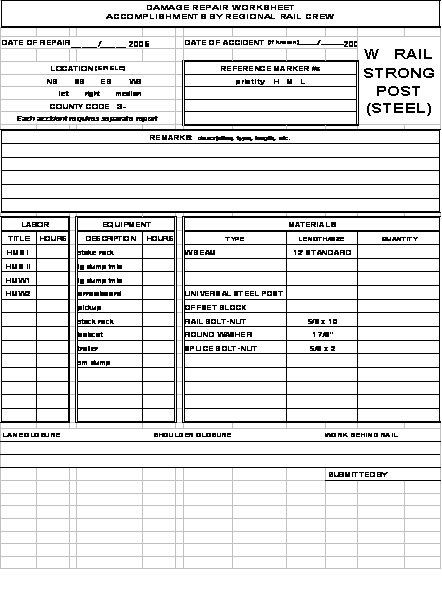
1. EXAMPLE OF DAMAGE INSPECTION REPORT
Damage inspection Report – New York State DOT
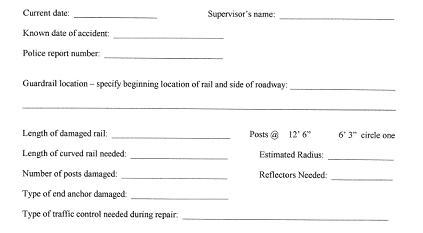
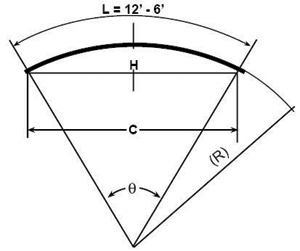
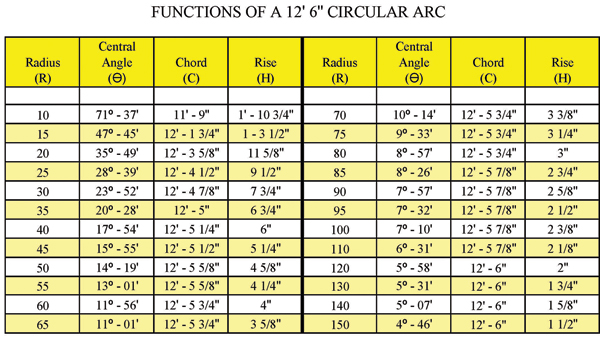
Calculating Guardrail Radius (to complete form above)
2. ESTIMATING PARTS AND MATERIALS FOR STANDARD SECTION W-BEAM REPAIR
Typical elements of the W-beam guardrail (a standard 12-ft, 6-in rail length is assumed; if an agency allows a 25-ft rail length, then make appropriate adjustments) include the following:
- 12-ft, 6-in steel W-beam rail sections (matching existing material – gauge, galvanizing, treated, or "rusting steel", etc.).
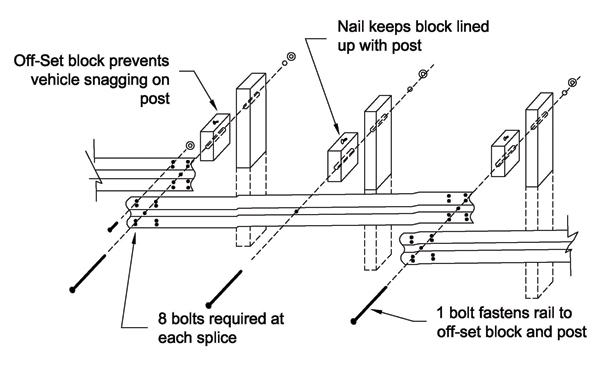
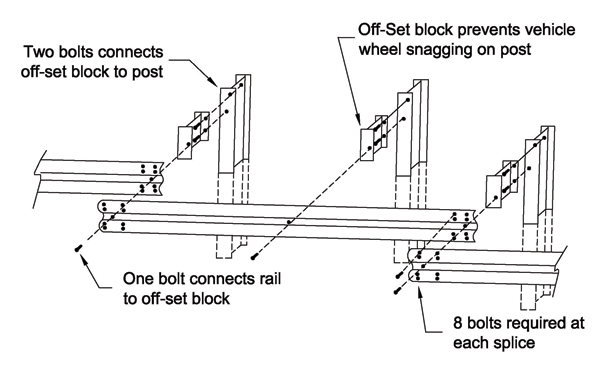
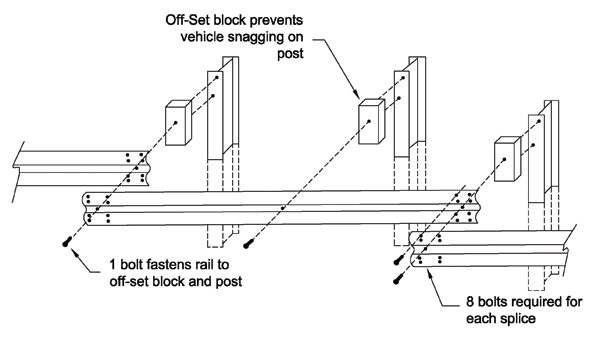
- Eight each 5/8-in by 1¼-in galvanized buttonhead bolts with recessed nuts for each rail splice.
- One each, ⅝-in rail-to-post galvanized buttonhead bolt with round washer and recessed nut for fastening rail to post; length varies depending on the type of offset block and type of post:
- Wood block to wood post: 18 inches.
- Wood or approved block to steel post: 10 inches.
- Steel block to steel post: 2 inches (no washer on back + 2 each –1½-in bolts to connect blockout to post).
- One each, 1-ft, 2-in wood offset block for wood post or approved offset block for steel post, to space the rail away from the post to minimize snagging.
- 6-ft, 0-in posts. To agency standard (6 by 8 or 8 by 8 wood posts or W6 by 8.5 or W6 by 9 steel posts.
- 12-in galvanized W-beam backup plate at intermediate steel post locations with steel offset block for placing behind rail where no rail splice occurs.
- 10d to 16d galvanized nail(s) to keep wood offset block from rotating on wood post.
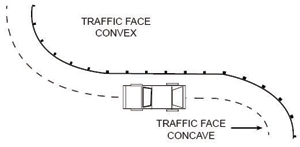
 Traffic
W-Beam with Wood Offset Block on Wood Post
Traffic
W-Beam with Approved Offset Block on Steel Post
Traffic
W-Beam with Steel Offset Block on Steel Post
| Item | Compute | Number needed |
|---|---|---|
|
W-beam galvanized steel rail sections 12-ft, 6-in-long, desirably punched @ 3ft, 1½ -in spacing |
Tally # of damaged Sections @ 12ft, 6 in |
|
|
⅝-in by 1¼ -in-long splice bolts with nuts |
(# sections x 8) + 8 |
|
|
⅝–in rail-to-post bolts with recess nuts and round washers for connecting rail to post and block |
(# sections x 2) + 1 |
|
|
6-ft , 0-in posts* |
(# sections x 2) + 1 |
|
|
Offset blocks |
Same as # of posts |
|
|
For wood block on wood post: 10 16d galvanized nails |
2 x # of offset blocks |
|
|
For steel block on steel post: 12-in W-beam back-up plate |
Same as # of sections |
|
|
For steel block on steel post: ⅝ -in by 1½ -in hex-head bolts to connect block |
2 x # of offset blocks |
|
|
Guardrail-mounted delineators |
Same as # of sections |
|
|
Object (hazard) markers |
1 for each end |
* If there is not adequate soil support behind the posts, use 7 ft or longer posts.
This list indicates an exact number of parts. Be sure to take into account additional numbers of each part for damage, loss, etc.
A detailed list like this is not appropriate for end-treatment repair/replacement. The proprietary manufacturers' installation manuals contain bills of material for each model of their products. Check these when conducting a complete replacement installation or for the appropriate quantities based on the amount of repair/replacement.
3. ESTIMATING EQUIPMENT AND TOOLS
The following is a listing of equipment and tools that will be needed for guardrail repair. There are two lists: the first is from a typical state highway agency truck; and the second is from a typical guardrail contractor truck. Make sure you comply with OSHA or your local regulations when using this equipment.
|
Supervisor Truck Supplies |
|
|
⅜-in drive ratchet and socket set (end treatments have small nuts and bolts) |
¾-in drive ratchet and socket set (bridge connections and anchor terminals) |
|
½-in drive ratchet and socket set with 3-in and 10-in extensions |
7/16 to 1⅛" sockets |
|
5 to 1¼" bell sockets |
4-in to ½-in drive sockets |
|
Four - splice pins, 2 pinch bars / pry bars |
Open end and box wrench set 5/16 to 1¼ inch |
|
Two ½-in impact wrench |
Two 5/16-in impact sockets |
|
Two 1⅛-in impact socket |
Three 1¼-in impact bell socket |
|
Two 1¼-in Impact Deep Bell Socket |
|
|
One 15-in adjustable wrench |
One 20-in adjustable wrench |
|
Four vise grip pliers |
Two 4-lb hammers |
|
One 18 lb sledge hammer |
One 10-lb sledge hammer |
|
Two flat shovels |
Two round shovels |
|
Two post hole digger |
Two digging bars |
|
One post puller |
Cut-off saw, extra blades |
|
Chain saw, bar oil |
Mix oil for saws |
|
2- or 3-gal mix gas can |
2 5-gal gas cans |
|
Hilti concrete drill set |
Hilti ½, ⅝, ⅞, 1-in bits |
|
3 7/8–inch-hole saws |
Epoxy |
|
Long heavy-duty jumper cables |
Ink markers |
|
Acetylene torch set |
Two chisels |
|
3500-watt generator |
Two 100-ft electric cords |
|
Two1/2-in VSR drills |
Two 1-in step bits |
|
Paint & cold galvanizer |
Penetrating oil / spray |
|
Two- Line levels |
String line |
|
Line pins |
200-ft steel tape |
|
G/R Standards and Specifications |
Construction Log Book |
|
Accident Investigation Reports |
Two Pull binders |
|
Maintenance of Traffic Standards |
Work zone signs & stands |
|
STOP / SLOW paddles |
Cones |
|
Hard hats, safety vests, safety glasses, gloves, |
MSDS Manual, Hazard Communication, Safety Manuals |
|
First-aid kit |
Blood-Born Pathogen Kit |
|
First-Aid Reports |
Wasp and bee spray |
|
5-gal water cooler |
Quantity sheets |
|
Respirators |
Camera |
|
Clipboard |
Timesheets |
|
Cell phone |
Credit cards |
|
Guardrail-mounted delineators |
Object Markers |
|
Post Pounder Truck / Rail Truck |
|
|
Add to Supervisor Truck Supplies: |
|
|
Truck-mounted post pounder – holds 30 posts – grease gun |
|
|
Air compressor, 92 CFM |
Two air hoses |
|
Hydraulic cylinder (pulling) |
Three chains |
|
Canvas strap for lifting |
One 60-lb jack hammer |
|
Two vehicle battery chargers |
Two Dewalt 18-volt wrenches |
|
Foreman Truck Supplies |
|
|
⅜-in drive ratchet and socket set (end treatments have small nuts and bolts) |
|
|
¾-in drive ratchet and socket set (bridge connections and anchor terminals) |
|
|
½-in drive ratchet and socket set with 3" and 10-in extensions |
|
|
7/16-in to at least 1⅛inch sockets |
One 20-in adjustable wrench |
|
Five 1¼-in bell sockets |
110-lb sledge hammer |
|
4½-in drive sockets |
118-lb sledge hammer |
|
Four splice pins |
115-in adjustable wrench |
|
Four vise grip pliers |
Combo open end and box wrench set 5/16 to 1¼ inch |
|
Two 4lb. hammers |
|
|
Post puller |
Chain saw |
|
Two flat shovels |
Cut-off saw |
|
Two round shovels |
Saw blades |
|
Two digging bars |
Mix oil for saws |
|
Two- post-hole diggers |
Bar oil |
|
Long, heavy-duty jumper cables |
Two or three gallon mix gas cans |
|
Two 5-gal gas cans |
Acetylene Torch Set |
|
Ink markers |
3500-watt generator |
|
Two 100-ft electric cord |
Two ½-in VSR drills |
|
Two 1-in step bits |
Three ⅞-in hole saws |
|
Two ½-in impact wrenches |
Two ½-in impact wrenches |
|
Two ½-in impact wrenches |
Four swivel sockets |
|
Two 5/16-in impact sockets |
Two 1⅛-in impact socket |
|
Three 1¼-in impact bell socket |
Two 1¼-in impact deep bell sockets |
|
HILTI concrete drill set with bits ½, ⅝, ⅞, 1 inch |
Clipboard, time sheets, quantity sheets |
|
Epoxy |
Dust mask |
|
Line levels |
Construction Log Book |
|
Line pins |
G/R Standards and Specifications |
|
String line |
Cell phone |
|
Credit cards |
Paint & cold galv. |
|
Accident Investigation Reports |
Two pull binders |
|
Camera |
Proper work zone signs & stands |
|
200-ft steel tape |
STOP / SLOW paddles / cones |
|
First-aid kit |
Blood-born pathogen kit |
|
First-Aid Reports |
M.O.T. Standards |
|
5 gal water cooler |
Penetrating oil / spray |
|
Wasp and bee spray |
|
|
MSDS manual, hazard communication, safety manuals |
|
|
Hard hats, safety vests, safety glasses, gloves, hearing protection |
|
4. ESTIMATING TIME NEEDED FOR REPAIR
General guidelines:
- Include travel time to and from the repair site when this is a maintenance activity scheduled from a central garage.
- Plan about 30 to 45 minutes to place the traffic control devices. It will take about the same time to gather the control devices after repair work is completed.
- Allow 30 minutes for final inspection of guardrail after finishing the repair and for recording the repair job.
- The time needed to make ANY repair depends on the experience and skill of the crew. The number of workers for the job and the amount of power-assisted tools available will also affect the time required.
Repairing cosmetic damage to guardrail installations--Should your agency want to repair the very minor type of damage mentioned earlier in this handbook, the actual repair (which may only be painting or minor straightening of a dented rail) should not require more than 30 minutes to 1 hour.
Repairing damage that still permits the guardrail to function --When the inspection of the damage at the site indicates:
- Only a few posts are broken.
- Only a few posts are pushed badly off line.
- A rail is bent out of line less than 18 inches.
Or other conditions exist that permit routine scheduling of the repair (rather than emergency repair), plan for 1 to 2 hours of repair time, plus traffic control, inspection, and recording.
Repairing major damage requiring prompt attention--When the guardrail damage is extensive, such as four or more posts are knocked out or several rail beam sections are broken, plan on one half day time requirement, including the traffic control setup, inspection, and recording.
FOR AGENCIES WITH MAINTENANCE MANAGEMENT SYSTEMS THAT GIVE A MORE DETAILED TIME BREAKDOWN, USE THAT TO ESTIMATE TIME.
5. ESTIMATING CREW SIZE
The crew size will depend upon the extent of the damage and the needs for traffic control. Two workers and a person in charge should be enough to repair minor damage where the guardrail is allowed to remain assuming the guardrail would function satisfactorily while the repair was scheduled. This assumes the work involves only a few posts or rail beam sections. When four or more posts are involved, or more than two rail beam sections are to be replaced, expect to need a crew of four. If a wide range of power-assisted tools is available, then a crew of three should work well.
Traffic control crew needs are as follows:
- If no person is to be assigned to flag traffic through the repair work zone, then no additional workers are needed. Workers repairing the rail can place and collect the traffic control devices. There can be situations causing short-term encroachment on the road to move equipment or to make brief repairs. Provide warning to traffic in such cases.
- Assign one worker as a flagger when the traffic cones or temporary barricades around the repair site restrict the road or street to alternating one-way traffic. USE ONE FLAGGER WHEN THAT WORKER CAN CLEARLY SEE TRAFFIC APPROACHING THE REPAIR SITE FROM BOTH DIRECTIONS AND THE FLAGGER SIGNAL CAN BE SEEN BY DRIVERS WELL IN ADVANCE OF THE REQUIRED STOP POINT.
- ssign two workers as flaggers for any other work zone conditions where traffic cones or barricades create alternating one-way traffic flow around the repair.
IF YOUR MAINTENANCE MANAGEMENT SYSTEM GIVES MORE DETAILED CREW SIZE INFORMATION BY WORK TASK FOR GUARDRAIL REPAIR, THEN USE THAT CREW SIZE ESTIMATE.
6. EXAMPLE W-BEAM GUARDRAIL REPAIR LOG
W-beam guardrail repair log
 \
\